
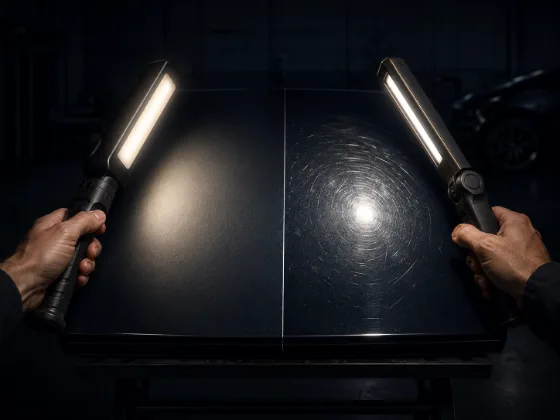
You can't correct what you can't see. Paint defects — swirl marks, buffer trails, water spots, fine scratches — exist in three dimensions on a surface that's also reflecting everything around it. Seeing them accurately requires the right light at the right angle. A bad inspection light doesn't just give you poor visibility. It actively misleads you, making a job look finished when it isn't, or revealing phantom scratches that don't exist in any other light.
This is the tool that most beginners underinvest in, then wonder why their corrections don't match what professionals produce from the same products and machines.
What Paint Defects Look Like Under Light
Understanding why lighting matters requires understanding how paint defects appear visually. Scratches and swirl marks are microscopic grooves in the clear coat — channels carved by grit or abrasive contact. These channels scatter and redirect light that hits them, rather than reflecting it cleanly like the surrounding undamaged surface. This scattering is what makes them visible: they look lighter than the surrounding paint because they're redirecting light at angles that reach your eyes instead of reflecting it cleanly away.
To see this scattering effect, you need a light source that's directional and intense enough to create contrast between the reflected light and the scattered light from the defects. Diffuse ambient light — overhead shop lighting, cloudy daylight — illuminates everything evenly. It reduces contrast and makes defects harder to see. A focused, intense, raking light source — one that hits the paint from an angle — creates maximum contrast and reveals every defect.
This is why a car can look perfect in the shade and be covered in swirls in direct sunlight. The sun is a sufficiently intense, directional light source. A good inspection light approximates that quality artificially.
What Makes an Inspection Light Good or Bad
Color temperature: Color temperature (measured in Kelvin) describes the color of the light. Lower Kelvin values are warmer (yellow-orange). Higher Kelvin values are cooler (blue-white). For paint inspection, you want 5000–6500K — daylight-balanced or slightly cool. This color range reveals defects most accurately and most closely matches the light conditions in which a car will be viewed. Warm yellow light (3000K) washes out contrast in light-colored paint. Very blue light (above 6500K) can create false impressions of blue-ish cast on darker panels.
Color rendering index (CRI): CRI is a rating of how accurately a light source renders colors compared to natural sunlight, on a scale of 0–100. A CRI of 95+ means the colors you're seeing under that light are very close to what they'd look like in full sunlight. A CRI of 70 means significant color distortion — reds may look orange, greens may look yellow. For paint inspection, CRI matters because you're evaluating paint color accuracy as well as defect visibility. A high-CRI light shows you what the paint actually looks like. A low-CRI light lies about the color.
Cheap LED inspection lights typically have CRI values of 70–80. They'll illuminate the surface, but colors are distorted and subtle defects in the transition zones are harder to evaluate. Lights rated CRI 90+ are what serious detailers use. CRI 95+ is ideal.
Intensity and focus: An inspection light needs to be bright enough to overpower ambient light and create the contrast needed to see fine defects. Lumen output matters — but so does beam pattern. A wide flood beam illuminates a large area evenly, which is useful for overall inspection but not ideal for revealing fine swirls. A narrower, more focused beam creates stronger raking light across the paint surface. Most quality inspection lights designed for detailing have some ability to position the light at varying angles relative to the panel surface — this angle adjustment is important for seeing different types of defects.
LED chip quality: Cheap LED lights use lower-binned LEDs — components that are sorted to the lower end of the brightness and CRI specifications. Premium lights use better-binned LEDs that produce consistent, accurate light. The difference is visible: a cheap light often has a slightly uneven or flickering quality that makes it fatiguing to work with and harder to evaluate the surface accurately. A quality LED produces consistent, stable light that the eye can read accurately over a long work session.
The Specific Problem With Cheap Inspection Lights
Cheap inspection lights — anything from a $10 shop light to an $30 LED inspection torch — fail in predictable ways:
Low CRI lies about color. A low-CRI light makes finished paint on a dark car look more defect-free than it is, because the reduced color accuracy flattens the visual contrast that reveals swirl marks. You finish a panel, check it under the cheap light, it looks good. You pull the car into daylight — and every swirl mark you thought you removed is still there. This happens constantly to beginners with cheap lights.
Wrong color temperature obscures specific defect types. Very warm light (3000K) makes holograms and buffer trails almost invisible on silver or grey paint — these defects are cool-toned and are masked by warm light. A cool, daylight-balanced light reveals them immediately.
Insufficient intensity means you work in ambient light. A light that can't overpower shop lighting or window light means you're seeing a combination of your inspection light and the ambient light — the defect visibility depends on where you're standing and how far the light is from the panel, not on a controlled, consistent view of the surface.
The Types of Inspection Lights
Handheld LED panels: The standard for most detailers. A flat LED panel, usually 6"–12" in size, on a handle. Battery-powered for portability. Brands like Scangrip, Larson Electronics, and Chemical Guys make detailing-specific models. These lights are designed to be held at varying angles to the panel surface, allowing you to change the raking angle and see different defect types.
Portable LED work lights / site lights: Larger format lights on a stand. These illuminate larger areas — useful for overall panel inspection and for working on larger vehicles. Less portable but more practical for a dedicated detail bay. Can be positioned on a stand at optimal height and angle.
Specialty swirl finder lights: Some lights are designed specifically for revealing swirl marks, using a specific beam pattern or diffused panel that makes fine swirls maximally visible. These are useful but not necessary — a quality daylight-balanced LED panel with adjustable angle does the same job.
Cheap shop lights / flashlights: Not appropriate for final inspection. They can reveal severe defects but will miss fine swirls and holograms. Using a flashlight to assess your paint correction work is like using a ruler to measure something to the nearest inch when the job requires millimeter accuracy.
How to Use an Inspection Light
Position the light close to the panel — typically 12"–24" away. Vary the angle between the light and the panel surface: a shallow raking angle (the light nearly parallel to the surface) reveals surface texture and fine swirls. A steeper angle (the light more perpendicular to the surface) shows different defect depths and deeper scratches.
Move along the panel rather than staying in one place — swirls and holograms can be directional, meaning they're more visible from one direction than another. The worst defects will show up regardless of direction; fine remaining haze may only appear in certain viewing angles.
Assess work area by area as you complete it, not all at once at the end. Catching a missed area immediately allows you to address it with the machine still set up. Discovering a missed area after you've cleaned up the machine means reassembling the whole setup.
Budget
A decent quality detailing inspection light from a brand like Scangrip starts around $80–$120 for a battery-powered handheld panel. This is where you want to be — not the $30 inspection torch from the auto parts store. If you're correcting paint seriously, the light is what tells you whether your work is done. A $40 savings on the light isn't worth the risk of leaving undetected defects on a $500 correction job.
Borrow or buy before you start doing paint correction work. Attempting paint correction without a quality inspection light is guesswork. The light isn't optional.