
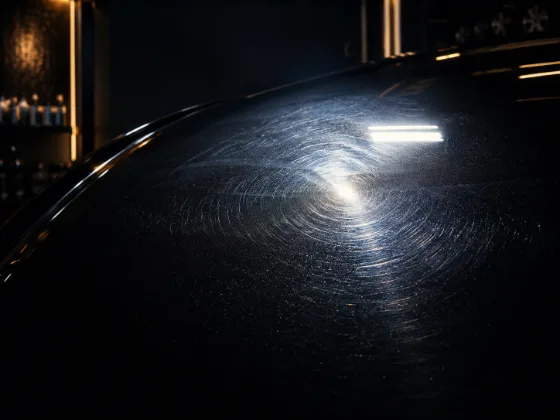
You just finished machine polishing the car. You wipe off the polish residue, step back, and the paint looks incredible. Then you move to a different angle and there they are — iridescent, shimmering trails that seem to move as you walk around the car. Not swirl marks. Not scratches. Something almost hypnotic, and completely wrong. Those are holograms, and they're one of the most common machine polishing mistakes.
The frustrating part is that you often can't see them until you've already wiped everything off and checked under direct light. But once you know what to look for — and what causes them — you can avoid them entirely.
What Holograms Actually Look Like
Holograms are iridescent and directional. Unlike swirl marks, which look like random spider webs scattered across the paint, holograms have a pattern — usually oval trails, repeating buffer swaths, or a consistent directional movement that traces the path of your machine. They shift color as you move around the panel: blue, purple, gold, green, depending on the light source and your viewing angle.
That color-shifting quality is the giveaway. Regular swirl marks look like dull gray scratches. Holograms actually shimmer. Under direct shop lighting or bright sun they can look almost beautiful — right up until you realize what they are and how much work is ahead of you.
Under diffuse or ambient light, holograms often disappear entirely. This is why detailers inspect their work under direct lighting — a panel that looks perfect in soft overhead shop light can reveal serious holograms the moment you pull it outside or shine a focused light at it.
How Holograms Differ from Swirl Marks
Swirl marks are random arc-shaped scratches distributed across the paint surface — they form from washing, drying, and everyday contact. Holograms are a product of machine polishing specifically. They follow the movement path of the pad, so they have directionality and pattern.
Swirl marks look chaotic under light. Holograms look organized — repeating ovals or streaks that map exactly to how you moved the machine across the panel. Once you see both side by side, you won't confuse them again.
The Physics: Why Holograms Look Iridescent
Here's the part that explains the color-shifting effect. When a rotary polisher or a DA moving too fast creates excess heat and friction, it doesn't just polish the clear coat — it cuts microscopic parallel grooves into the surface. These grooves are incredibly fine, much finer than a visible scratch, but they're oriented in the same direction because they were made by a spinning or oscillating pad moving along a consistent path.
When light hits a surface with parallel microscopic grooves, it diffracts — it splits into different wavelengths (colors) depending on the angle of incidence. This is the same optical phenomenon responsible for the colors you see in a CD or DVD. The grooves act as a diffraction grating. As you move around the car and change the angle of the light hitting the surface, different wavelengths reflect back to your eye — hence the color shift.
Regular swirl marks scatter light randomly, producing a dull, hazy look. Hologram grooves diffract light in a structured way, producing those iridescent colors. The physics is the same reason soap bubbles show color even though they're transparent.
What Causes Holograms
Holograms come from specific machine polishing errors. Understanding the causes makes them easy to prevent.
Too much heat from a rotary. Rotary polishers spin in one direction continuously, generating more heat than dual-action (DA) polishers. If you apply too much pressure, move too slowly, or let the pad dwell in one spot, that heat builds up in the clear coat. The clear coat softens slightly, and the pad creates those parallel micro-grooves rather than abrading the surface evenly. DAs can cause holograms too, but rotaries are far more likely to do it.
A loaded pad. A pad clogged with dried or spent polish product stops cutting evenly. The abrasives in the pad stop doing their job and the pad itself starts dragging across the paint — creating friction and heat rather than controlled abrasion. This is a common cause of holograms mid-detail: you've been polishing for a while, haven't cleaned or flipped the pad, and without realizing it the pad has switched from polishing to dragging.
Moving too fast. Counterintuitively, moving the machine too quickly across the panel can also cause holograms. Moving too fast means the abrasives don't have time to do their work properly, so they skip across the surface rather than cutting evenly — leaving directional marks. The right speed is deliberate, roughly 1–2 inches per second depending on the product.
Wrong pad choice. Using a cutting pad with a finishing polish, or a cutting pad when a polishing pad would be appropriate, puts more mechanical energy into the paint surface than the product was designed for. The mismatch means you're not getting controlled, uniform abrasion — you're getting aggression the polish can't manage, which creates uneven surface patterns.
Why Holograms Hide Until You Wipe Off the Polish
This is one of the most important things to understand about holograms, and it catches a lot of people off guard. Polishes contain oils — they're part of what keeps the product lubricated and workable. These oils temporarily fill in fine surface defects, including hologram grooves. When polish is still on the panel, the surface looks better than it actually is.
Once you wipe the polish off, the oils come with it and the actual surface condition is exposed. A panel that looked perfect with residue on it can reveal significant holograms once you wipe it clean. This is why the inspection step always comes after a full wipe-down, not during or immediately after polishing.
The IPA Test: Confirming the Holograms Are Gone
After polishing and wiping off residue, some people do an isopropyl alcohol (IPA) wipe as a confirmation step. IPA strips any remaining oils from the surface, leaving you with a completely unmasked view of the clear coat's actual condition. If holograms are present but being hidden by residual product oils, the IPA wipe reveals them.
Use a 50/50 mixture of IPA and distilled water on a clean microfiber, wipe the panel, and immediately check under direct light. What you see after the IPA wipe is exactly what you'll see after the car is detailed and sitting in sunlight with no product on it. No surprises later.
Which Cars Hologram More Easily
Softer clear coats hologram more readily. German paint — BMW, Mercedes, Audi, Porsche — is particularly susceptible. Soft clear coat deforms more easily under heat and friction, which is exactly the condition that creates hologram grooves. The same aggressive technique that works fine on a harder domestic paint can produce significant holograms on a soft European clear coat.
Dark colors make holograms more visible, just as they do with swirl marks. The diffractive color shift on black or dark blue paint is dramatically more obvious than on white or silver. That doesn't mean light-colored cars don't get holograms — the defects are there, they're just less visible.
How to Remove Holograms
Holograms respond to a finishing pass. The goal is to refine the surface after aggressive correction, evening out the micro-grooves left by the previous stage.
Use a soft finishing pad with a finishing polish on a DA polisher at a lower speed setting — typically 3–4 on a six-speed machine. Work at a deliberate pace, overlapping passes by 50%. The finishing polish's finer abrasives and the softer pad work together to level the surface without the aggressive cut that created the holograms in the first place.
On particularly stubborn holograms from rotary work, you may need to start with a polishing pad and medium polish before moving to the finishing step — essentially doing a refinement stage between your correction and your finishing stage. Then do the IPA wipe to confirm they're gone before applying any protection.
Prevention: The Right Habits from the Start
Holograms are almost entirely preventable with proper technique.
Keep the machine moving. Never let the pad sit in one spot with the machine running. Constant motion distributes heat and abrasion evenly across the panel.
Work out of direct sunlight. Heat accelerates hologram formation. Polish in the shade or indoors where the paint and ambient temperature aren't adding to the heat generated by the machine.
Match your pad and product. Don't pair a cutting pad with a finishing polish or vice versa. The pad's aggressiveness and the product's cut level should be matched to the correction stage you're in.
Clean or flip your pads regularly. A loaded pad stops polishing and starts creating problems. On larger panels, take a moment to clean the pad with compressed air or a pad cleaning brush mid-section. It takes thirty seconds and prevents loaded-pad holograms entirely.
Always finish with a finishing step. Even when you think the correction stage left the paint looking good, a finishing pass with a soft pad and finishing polish refines the surface in a way that eliminates any subtle holograms from the correction stage. It's the difference between paint that looks good in the garage and paint that looks perfect in sunlight.
The Finishing Step Is Not Optional
A lot of detailers — especially people earlier in the learning curve — skip the finishing step because the paint already looks great after cutting and polishing. This is how holograms end up on a car that was supposed to be fully corrected.
The finishing step isn't just for gloss. It's specifically for eliminating the surface micro-texture left behind by more aggressive stages. That micro-texture, under the right conditions, produces holograms. The finishing polish removes it. It adds maybe fifteen to thirty minutes to the total job time, and it's the step that separates a correction that holds up under all lighting conditions from one that only looks right in the garage.
Do the IPA wipe after the finishing step. Confirm what you see. Then apply your protection. In that order, every time.