
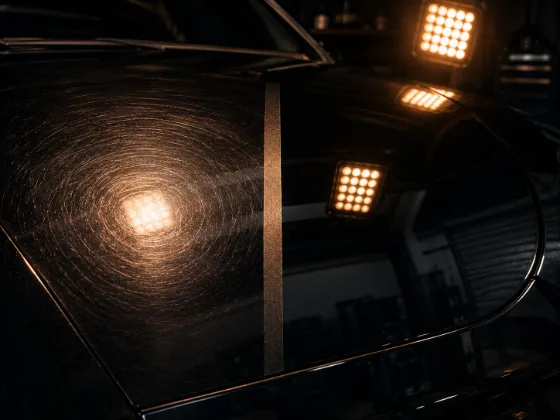
Paint correction is not a forgiving process. You're removing clear coat — a finite resource that doesn't grow back. Before you commit to running a compound across an entire panel, let alone an entire car, you need to know what you're working with. That's what a test spot is for.
Skipping a test spot on unfamiliar paint is how you end up burning through clear coat on a panel you thought you were fixing. A test spot takes twenty minutes. Repainting a hood takes a lot more.
What a Test Spot Actually Tells You
A test spot answers four questions before you do any real work: How much correction can this paint deliver? Which pad and product combination achieves it? How many machine passes are needed? And is the paint in good enough condition to handle correction at all?
Answering all four in advance means you don't have to guess on the rest of the car. You run the same combination, same passes, same speed. Consistent results across the whole vehicle instead of chasing inconsistent outcomes panel by panel.
Choosing Where to Run the Test
The test spot goes on a flat, accessible panel away from edges, curves, and body lines. The center of a door or the middle of a hood are ideal. You want flat geometry — edges and curves are thinner and heat up faster, so they don't represent the rest of the paint.
Pick an area with visible defects — swirl marks, light scratches, water spots — so you have something to measure correction against. A test spot on perfect paint doesn't tell you much.
Avoid testing near trim, emblems, or rubber seals. Product can work into gaps and is difficult to remove. Give yourself at least a few inches of clearance from any edge.
Measure Paint Thickness Before You Start
A paint thickness gauge is not optional for serious correction work. Before your first test pass, take several readings on the test panel and around it. Write them down.
Factory paint on most vehicles runs between 4 and 6 mils total — base coat, clear coat, and primer combined. Clear coat typically accounts for 1.5 to 2.5 mils of that. If your readings are already at 3 mils total or less, someone has painted or heavily polished this car before. You have less working room than factory paint.
Knowing the baseline thickness also gives you a reference point. After the test spot, take readings again in the same locations. A well-executed test pass shouldn't register a measurable change on a gauge — but if you see a significant drop, you're being too aggressive or generating too much heat.
The Testing Hierarchy: Start Gentle, Work Up
Always begin with the least aggressive option available. The goal of the test is to find the minimum effective combination — the one that achieves the correction you need without over-working the paint.
Start with a finishing pad and a light polish. Run a test section of roughly 16 by 24 inches (a standard dual-action polisher pad covers about that area in a 4-by-4-pass pattern). After wiping off the residue, inspect the results in direct light or under an inspection lamp.
If correction is minimal, step up one level: move to a polishing pad with the same product, or keep the finishing pad and move to a more aggressive compound. Test again in an adjacent section of the same panel. Continue stepping up until you achieve the level of correction the paint needs or until the results tell you to stop.
Documenting which section you used for each combination is useful. Take photos. A simple labeled photo of the test panel with notes on what you used for each section is a reference you'll appreciate when you're three panels in and can't remember the exact process.
Machine Settings: Speed, Pressure, and Overlap
Your machine settings are part of the test. Document them as carefully as your pad and product choice.
For a dual-action polisher, most correction work runs between speed 4 and 6 on a typical variable-speed machine. Start at the lower end for your first test pass. Higher speed generates more heat and more aggression — both of which you're calibrating against the paint's response.
Arm speed — how fast you move the machine across the panel — directly affects heat and cut. Moving slower keeps the pad in contact longer and increases cutting action. Moving faster reduces it. A standard pace is about one to two inches per second for correction work. If the paint is hard and you need more cut, slow down before you increase product aggression.
Overlap your passes by 50 percent. Four horizontal passes, then four vertical passes equals one full working cycle. After that cycle, wipe off residue with a clean microfiber and inspect before deciding whether to run another cycle.
Light, consistent pressure. Let the machine and the pad do the work. Pressing down hard doesn't add meaningful cut — it adds heat and risks burning the paint on edges and high spots.
Reading the Results: The IPA Wipe
After your test section, wipe the residue off with a clean microfiber and look at the paint. Polish residue and oils left by the pad can fill in and mask remaining defects — this is called a "haze fill" effect, and it gives you a falsely optimistic read on how much correction happened.
To see the real result, do an IPA (isopropyl alcohol) wipe. Mix isopropyl at roughly 30 to 50 percent with water. Wipe a clean microfiber over the test section. This removes any oils, silicones, and filler left by the polish and reveals the actual surface condition underneath.
Inspect after the IPA wipe, not before. What you see now is what the paint actually looks like. Remaining swirls mean you need more passes, more aggression, or both. A clean surface with no remaining defects means your combination worked.
Understanding Paint Hardness
Paint hardness varies significantly between manufacturers, model years, and even between panels on the same car (repainted panels often have different clear coat than factory panels). Hardness is the single biggest variable that affects how your test results translate to the rest of the car.
Soft paint — common on many European vehicles and older Japanese cars — cuts quickly. A finishing pad with a light polish may be all you need, and over-polishing soft paint is easy to do. The test spot will show fast correction with light product, but watch the heat and don't keep adding cycles just because you can.
Hard paint — common on newer Japanese and Korean vehicles, some domestic trucks — resists cutting. You might run three full cycles with a light combo and see minimal improvement. Hard paint often needs a more aggressive pad, a more aggressive compound, or both. The test spot protects you here: you won't waste an hour working a door with a combination that's not sufficient.
One reliable field indicator of paint hardness: how quickly the polish dries during the working cycle. Soft paint tends to break down polish quickly, and you'll see the residue turn to dust fast. Hard paint takes longer to work down. Use this as a real-time read while you're on the machine.
When the Test Spot Tells You to Stop
Sometimes the test spot delivers a result you don't want. The most common warning signals:
You see deeper scratches after polishing that weren't visible before. This means the polish removed a layer of fine scratches that were masking coarser ones underneath — a phenomenon called "digging." At this point, don't keep going. You need to assess whether those deeper scratches can be corrected at all, or whether you're working beyond what the paint can deliver.
The paint thickness gauge shows a notable drop after a single test cycle. If you're removing measurable clear coat in a test section, you don't have the thickness budget to correct the whole panel. Dial back the aggression or set realistic expectations about correction depth.
The paint is burning or glazing on the first pass. Excessive heat in the clear coat produces a dull, slightly milky look at the edges of the work area. This is usually caused by moving too slowly, pressing too hard, or running too high a speed setting. Adjust before continuing.
The correction is essentially zero after stepping all the way up to the most aggressive combination available. Some scratches are too deep for paint correction — they've gone through the clear coat into the base coat. Polish will clean up the surrounding area but won't make the scratch disappear. Managing the customer's or your own expectations at this point is more honest than burning through more clear coat chasing a result that isn't achievable.
Scaling to the Rest of the Car
Once the test spot confirms a working combination, replicate it consistently across the vehicle. Same product, same pad, same speed setting, same arm speed, same number of passes per section.
Don't assume every panel will behave identically to the test panel. Repainted panels, previously polished areas, and panels with significantly different exposure history may respond differently. Check your work after each panel and be willing to adjust within the parameters the test established.
Take thickness readings periodically as you work. Not after every section, but spot-checking panels — especially hood, roof, and trunk where heat and UV exposure tend to thin the clear coat over time — keeps you informed throughout the correction process.
A well-executed test spot doesn't just protect the paint. It makes the rest of the job faster, more predictable, and more professional. Twenty minutes of upfront work to nail the process is twenty minutes well spent.