
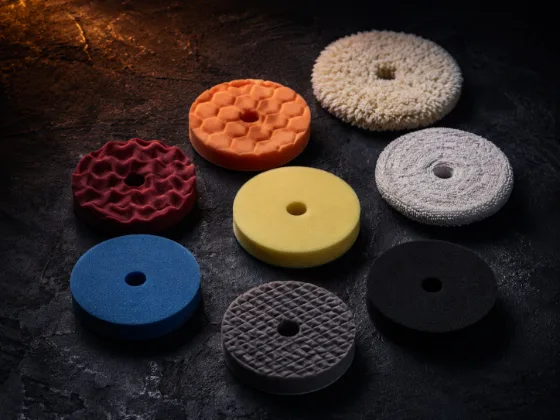
Most people focus on the compound or polish when they think about paint correction. The pad is almost an afterthought — grab whatever's in the kit and get to work. That's a mistake. The pad you're running determines how aggressively the product cuts, how much heat it generates, and what the surface looks like when you're done. The right compound on the wrong pad produces bad results. The right pad on the right machine with the right product is what paint correction is actually about.
Why the Pad Matters as Much as the Product
Think of the pad and the product as a system. The product contains abrasives. The pad delivers those abrasives to the paint surface and controls how much mechanical energy goes along with them. A soft finishing pad with an aggressive compound gentles the compound significantly — less mechanical pressure, less heat, less cut. The same compound on a firm cutting pad amplifies its effect.
The cell structure of the foam, the density, and the surface texture all determine how the pad interacts with both the product and the paint. Open-cell foam spreads product quickly and aggressively. Closed-cell foam holds product and releases it gently. Microfiber cuts with the fiber tips rather than the substrate. Each does something fundamentally different.
The Three Main Categories
Pads break down into three functional categories. Within each category there's variation, but understanding the three tiers is the foundation.
Cutting Pads
Cutting pads are designed for maximum material removal. They're typically open-cell foam — firm, with a coarser cell structure that moves compound aggressively across the paint surface. The firmness allows the pad to apply consistent pressure across the abrasive particles in the compound, maximizing their cutting action. They also generate more heat than polishing or finishing pads because of that increased friction.
Cutting pads are for heavy correction: deep swirl marks, light scratches, sanding marks from wet sanding, oxidation. When the defects are significant and you need to remove meaningful material from the clear coat, a cutting pad is the right choice. They're not for refining — after a cutting pad pass you will always need follow-up stages.
Polishing Pads
Polishing pads sit in the middle. Medium-density foam with a cell structure that balances correction and surface refinement. They provide enough mechanical energy to remove light-to-moderate defects — light swirl marks, mild haze, fine scratches — while leaving the surface in better condition than a cutting pad would.
For most one-step correction jobs (light swirls on a car that gets regular maintenance), a polishing pad with a good polish does the job cleanly without requiring an additional refinement step. It's the most versatile category — the workhorse of a regular detail.
Finishing Pads
Finishing pads are soft, often closed-cell foam with a fine surface texture. They don't cut paint — they spread product and refine the surface left behind by previous stages. A finishing pad with a finishing polish removes the micro-texture left by cutting and polishing pads, eliminates holograms, and brings the clear coat to maximum gloss.
Finishing pads are also used for applying glazes and some protection products by machine, where you want even coverage without any abrasive action at all. The pad's softness means it conforms to curves and edges better than stiffer pads, which matters for thorough coverage on complex body shapes.
Microfiber Cutting Pads vs. Foam Cutting Pads
This is a distinction worth understanding because microfiber pads behave differently from foam pads in the same category.
Microfiber cutting pads cut more aggressively than foam cutting pads of equivalent claim. The microfiber tips act as tiny abrasive tools themselves, in addition to delivering the compound's abrasives to the paint surface. They also run cooler than foam cutting pads — the microfiber structure dissipates heat more efficiently — which makes them safer on sensitive paints where heat buildup is a concern.
The tradeoff is that microfiber pads require more careful cleaning and maintenance than foam. They load with spent compound more quickly, and improper cleaning can damage the fibers. But for heavy paint correction on soft clear coats, a microfiber cutting pad is often the better choice precisely because it cuts well while staying cooler.
Foam cutting pads are slightly more forgiving and easier to work with for people newer to machine polishing. Either approach works — the choice depends on the severity of the correction, the paint softness, and your comfort level with the tools.
Pad Size: Matching to the Backing Plate and Work Area
Pad size matters in two ways: matching the backing plate, and matching the work area.
A 6-inch pad goes on a 5-inch backing plate, a 5-inch pad goes on a 5-inch backing plate — or a 4-inch backing plate if you want edge coverage without the pad overhanging significantly. The general principle is that the pad should be 1 inch larger than the backing plate for most work. This allows the edge of the pad to flex and prevents the backing plate's hard edge from marking the paint.
3-inch spot pads are for confined areas: jambs, A-pillars, tight curves, small defect areas where a full-size pad can't maneuver properly or would apply too much pressure. They go on a 3-inch backing plate, usually on a smaller DA or a separate rotary that's easier to control in tight spaces.
For large flat panels — hoods, roofs, trunks — a 6-inch pad is efficient and covers ground quickly. For complex shapes, smaller pads give you better control and more consistent pressure across the surface.
Reading the Pad: What the Residue Tells You
The compound or polish residue on the pad after a section tells you what happened. Learning to read it saves you from making avoidable mistakes.
Fresh product that's still creamy and working: the pad has more life left. Keep going. A loaded pad caked with dried, gray-brown residue: the product has been worked out and the abrasives are spent. This pad is no longer polishing — it's dragging. Clean it or grab a fresh pad.
If the residue on the pad is the color of the base coat (you're seeing color coming off), you've cut through the clear coat. Stop immediately. This is a serious problem that requires attention beyond standard polishing.
A pad that's worked product evenly across its face is doing its job. A pad where product has migrated to one edge indicates you're applying uneven pressure — typically too much pressure on one side of the machine or body position pulling the pad off-level.
Priming a New Pad
New pads — especially foam — need to be primed before their first use. A dry foam pad absorbs a significant amount of the first application of product, which means the first pass works differently than subsequent passes. If you apply compound to a dry pad and start polishing, the foam soaks up the product and you end up with very little compound at the surface for the first minute of polishing.
Priming means applying a light mist of water to the pad before adding your polish or compound. This pre-saturates the foam so it doesn't drink your product. The amount is small — just enough to dampen the face of the pad, not soak it through. After the first use, the pad is primed and you don't need to do this again until it's been fully washed and dried.
Cleaning Pads Mid-Detail
You have three options for cleaning pads during a detail session, depending on what you have available.
Compressed air. Blowing out spent product with an air gun is the fastest and safest method during a session. It removes dried residue from the cell structure without getting the pad wet. Keep the gun moving across the pad face rather than holding it in one spot. Works best for foam pads; microfiber pads require more care to avoid flattening the fibers.
Pad cleaning brush. A stiff-bristle cleaning brush applied to a running pad (on the machine, low speed) with a pad cleaning spray or water breaks up and removes residue quickly. More thorough than compressed air for heavily loaded pads, and fine for mid-session use as long as you let the pad dry slightly before applying fresh product.
Rinse and dry. For end-of-session or end-of-stage cleaning, washing pads with a gentle detergent and water, then air-drying them completely before the next use. Never use hot water or machine washing with aggressive detergents — both break down foam cell structure over time. Machine washing on delicate cycle in cold water with a gentle soap is fine for foam pads. Microfiber pads can be machine washed but should always air-dry rather than go in the dryer.
When to Retire a Pad
Pads don't last forever. Knowing when to replace rather than clean is important because a degraded pad produces degraded results.
Retire a pad when the foam has lost its original shape — compressed flat in the center, or with a divot that doesn't spring back. The uneven surface means uneven pressure distribution across the paint, which produces uneven results and can cause haze or hologram patterns.
Retire a pad when the foam cells have broken down visibly — the cell structure looks collapsed or the foam tears when you flex it. Broken-down foam absorbs product rather than delivering it and provides inconsistent cutting action.
Retire a pad when contamination won't wash out. If cleaning still leaves the pad feeling stiff, gritty, or discolored with residue that won't release, it's contaminated past the point of usefulness. A contaminated pad introduces unpredictable abrasion and can cause scratching on otherwise clean paint.
Pad Color Coding: What Actually Matters
The industry is not standardized on pad colors. Lake Country, Rupes, Meguiar's, Griot's, Chemical Guys — they all use different color systems. Orange means cutting in one brand and polishing in another. Relying on color alone to identify a pad is a mistake.
What actually matters is understanding the foam's density, cell structure, and surface texture — and reading the product description from the manufacturer rather than assuming from color. When you pick up a new pad, check what the manufacturer says it's designed for. Over time you'll learn to feel the difference between pad categories by compressing them in your hand: firm and open-cell is cutting, medium density is polishing, soft and closed-cell is finishing.
If you're building a pad collection, buy within one brand system and learn that system's color coding. It'll be consistent within that system even if it doesn't transfer to other brands.
Practical Decision Tree: Swirl Removal on a Daily Driver
Here's how to work through a typical swirl removal job on a car with moderate paint condition — not a show correction, just a driver that's been washed improperly and has accumulated light-to-moderate swirl marks over time.
Assessment first. Check the paint under direct light. If swirls are visible in direct sun but the paint still has reasonable gloss and depth, you're dealing with light-to-moderate defects. If the paint looks hazy even in indirect light and the scratches catch your fingernail, you're dealing with heavier defects.
Light swirls: Polishing pad + medium polish on a DA at speed 4–5. Two passes with 50% overlap per section. Wipe off and inspect. One stage may be enough. Finish with a finishing pad + finishing polish at speed 3–4 to refine. IPA wipe to confirm. Protect.
Moderate swirls: Cutting pad + compound on a DA at speed 5–6. One or two correction passes. Wipe and inspect. Follow with a polishing pad + medium polish to refine the compound marks. Then finish with a finishing pad + finishing polish. IPA wipe to confirm. Protect.
Heavy swirls or scratches: Same as moderate, but the compound stage may require more passes or higher speed. Wet sanding may be necessary before compounding if scratches are deeper than the clear coat surface layer. This is where a test spot matters: do a small section, correct it fully, inspect it, and confirm the approach works before doing the whole car.
The finishing step is not optional in any of these scenarios. It's what takes the paint from corrected to actually finished — a surface that looks right under every light condition, not just in the garage.