
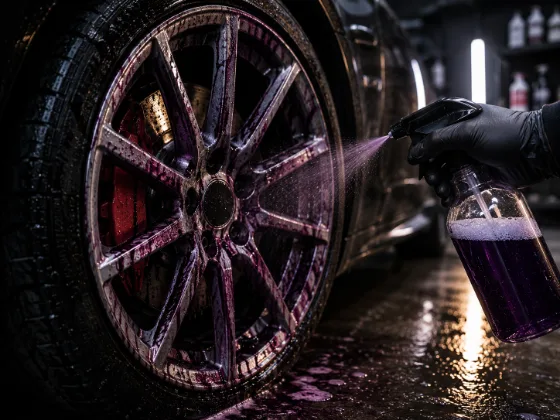
If you've never used an iron remover before, the first time is genuinely impressive. You spray it on a car you just washed, watch it turn from clear to a deep purple-red, and realize the paint you thought was clean is actually covered in invisible contamination.
That color change isn't a gimmick. It's a chemical reaction telling you exactly what's on your paint and where it's concentrated. Understanding what's happening helps you use this product correctly and know when it actually matters.
What Iron Contamination Is
Your car's paint accumulates iron particles continuously. Most of them come from two sources:
Brake dust: Every time you brake, your rotors and pads shed metallic particles. These particles are hot when they leave the rotor — hot enough to partially embed themselves into whatever surface they land on. Your paint is the largest flat surface they encounter. Over time, they accumulate all over the car, but heaviest on the rear panels near the wheels.
Rail dust / industrial fallout: If you live near a rail line or in an industrial area, ferrous particles from rail grinding, industrial processes, or air pollution settle on your car constantly. These particles are smaller than brake dust particles but just as damaging over time.
Once embedded, these iron particles do something nasty: they oxidize. Rust forms inside the clear coat around the embedded particle, creating a small crater of corrosion that can eventually degrade the paint structure. Those tiny brown specks you sometimes see on white or silver paint aren't dirt — they're iron particles that have started to rust.
How Iron Remover Works
Iron removers use a chemistry called thioglycolate or similar compounds that react specifically with iron and iron oxide. When the product contacts an iron particle, it chemically converts the metal compound into a water-soluble complex — something that can actually rinse away.
The purple color is a byproduct of this reaction. The product itself is often clear or slightly yellow; the purple-red color develops as it reacts with iron. More color means more iron. A section that turns deep purple has a heavy contamination load; a section that stays mostly clear is relatively clean.
This is also why iron removers are safe to use on paint without scrubbing. The chemistry is doing the work, not mechanical abrasion. You let it react, then rinse. The iron comes off without you having to touch the surface.
What Iron Remover Doesn't Do
This is important: iron remover only addresses iron contamination. It doesn't remove:
- Road tar and bitumen spots
- Tree sap
- Industrial overspray
- General environmental fallout (non-iron)
- The rough, sandpaper texture of bonded surface contamination
After using an iron remover and rinsing, your paint might look cleaner but still feel rough. That roughness is non-iron contamination — the kind that requires clay bar treatment to remove. Iron remover and clay bar are complements, not substitutes for each other.
When to Use It
Iron remover should be used whenever you're doing a full decontamination cycle — which typically means before applying a coating, sealant, or wax, and at the start of any significant paint correction work.
Signs that iron contamination is present and heavy:
- Small orange or brown specks visible on the paint, especially on lighter colors
- Rear panels feel rougher than front panels when you do the plastic bag test
- It's been more than six months since the last decontamination
- The car has been parked near a rail line or industrial facility
If none of those apply and you're just doing a maintenance wash, you don't need to iron-decontaminate every time. It's a periodic step, not a weekly one.
How to Use It: Step by Step
The process is straightforward, but the order of operations matters.
Step 1 — Wash the car first. Remove surface dirt before applying iron remover. You want the product to contact the iron particles, not float over a layer of road grime.
Step 2 — Apply to cool, wet, or dry paint. Iron remover can be applied wet or dry, but avoid applying it to hot paint in direct sunlight. It can dry before it finishes reacting, which reduces effectiveness and can leave residue.
Step 3 — Spray evenly and allow to dwell. Most products need 3–5 minutes. You'll see the color change starting within a minute or two. Don't let it dry — if conditions are hot or dry, mist with water to keep the surface wet.
Step 4 — Agitate if needed. On heavily contaminated areas, a light agitation with a soft brush or microfiber can help loosen stubborn particles, but it usually isn't necessary.
Step 5 — Rinse thoroughly. Rinse completely with good water pressure. The iron compounds need to be fully flushed off the surface.
Step 6 — Follow with clay bar. Iron remover removes the chemical contamination. Clay bar removes the physical contamination that remains. Do both in sequence for a complete decontamination.
Safe on Wheels Too
Iron removers work brilliantly on wheels, where brake dust contamination is heaviest. Most wheel surfaces — painted, clear-coated, polished alloy — are safe for iron remover application. The product pulls the heavy brake dust residue off wheels far more effectively than scrubbing alone.
Apply it to dry wheels before washing. Let it dwell and react, then agitate with a wheel brush before rinsing. You'll see the purple reaction happening in real time, and it's dramatically more effective than scrubbing with shampoo alone.
How Often?
For a daily driver in a typical environment: every 4–6 months, or as part of any full decontamination cycle before applying protection.
For a car parked near a train line, a car with heavy brake dust visible on the paint, or a car being prepped for paint correction: do it now, regardless of when the last one was done.
The color reaction tells you whether you needed it. Heavy purple means you needed it badly. Light or no reaction means contamination was minimal. Over time you'll develop a sense of your car's contamination rate based on how it reacts.
The Bottom Line
Iron remover is one of the most targeted and effective tools in detailing. It does one job — removes embedded iron contamination — and does it without any mechanical abrasion or risk to the paint. The color change gives you real-time feedback on contamination levels. And after you see a heavily contaminated car react to it for the first time, you'll wonder how you ever thought a wash was enough.