
You wash your wheels. You use a brush. You rinse. They look clean. But if you've never used iron remover on your wheels, there's almost certainly contamination still on them — contamination your shampoo can't touch.
This article is specifically about iron remover on wheels: when to use it, why it works, how to apply it correctly, and what mistakes to avoid.
What Iron Remover Actually Does
Iron remover is a chemical product that contains a chelating agent — typically ammonium thioglycolate — that bonds to iron oxide and converts it into a water-soluble compound. This is different from how soap and water work. Shampoo lifts loose contamination off the surface. Iron remover chemically reacts with bonded iron and dissolves it from the surface at a molecular level.
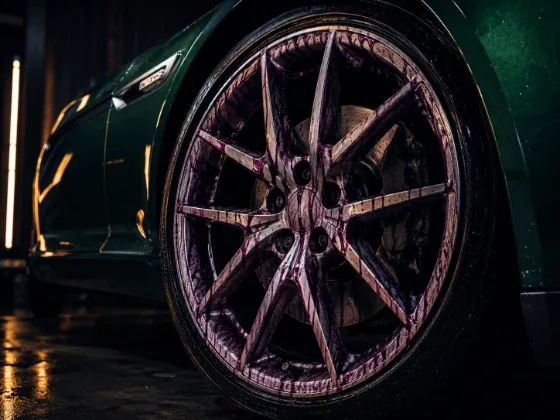
The purple color change you see when iron remover contacts contaminated wheels is the chelation reaction happening. The product reacts with iron oxide and forms a colored complex — a visual confirmation that bonded iron is being removed. Areas with heavy contamination react strongly. Clean areas show little or no reaction.
What iron remover removes is the bonded iron that accumulates from brake dust. Every time your brakes are applied, iron particles from your brake pads and rotors get ejected and land on your wheels. If they're not removed promptly, they oxidize and bond to the wheel finish. Regular wheel washing removes loose contamination and some surface brake dust, but it doesn't remove iron particles that have oxidized and chemically bonded to the surface. Iron remover does.
When to Use Iron Remover on Wheels
There are two situations where iron remover on wheels is appropriate:
As part of a regular decontamination cycle. If your car has semi-metallic brake pads — the most common type on American vehicles — brake dust contamination accumulates quickly. For most cars in normal driving conditions, iron decontamination on the wheels every 4–8 weeks is appropriate. Add it to your routine alongside regular washing. Wash first to remove loose contamination, then apply iron remover for the bonded iron.
When you notice wheel contamination that washing won't shift. If your wheels look dirty after a thorough wash, or if brake dust seems to bond and darken rapidly between washes, iron contamination is the likely cause. A single iron remover treatment will reset the surface, and establishing a regular decontamination schedule afterward will keep contamination from building to that level again.
Which Wheels Can You Use Iron Remover On?
Iron remover is safe on virtually all wheel finishes when used as directed:
- Clear-coated alloy wheels — safe. The pH of most iron removers is near-neutral after dilution, and the chelating agents don't attack clear coat.
- Powder-coated wheels — safe. The coating resists iron remover chemistry.
- Chrome-plated wheels — safe. Chrome resists the chemistry, and the chelating agents work on the brake dust contamination on the surface rather than the finish itself.
- Polished aluminum (bare) — safe, and particularly important. Iron contamination on bare aluminum causes galvanic corrosion between the iron oxide and the aluminum substrate. Regular iron decontamination is important for polished aluminum wheels.
- Anodized wheels — generally safe, but verify with the product instructions. Most iron removers are fine.
Where to be careful: some iron removers are marketed as "pH-balanced" and are significantly safer across more finishes than older-formula iron removers. If you're working on a high-end or rare finish, verify the product is pH-balanced before applying. The older-style, more acidic iron removers have a narrower safe-use range.
Step-by-Step: How to Use Iron Remover on Wheels
Step 1: Wash the wheels first. Remove loose brake dust and surface contamination before applying iron remover. Iron remover is more effective — and more efficient — on a surface that's already been cleaned of loose debris. Rinse the wheel and let excess water drain but don't dry completely.
Step 2: Check the wheel temperature. Iron remover should be applied to a cool wheel surface. If the car has been driven recently, let it sit for at least 30 minutes before applying iron remover. Hot surfaces cause iron remover to react and dry too quickly, which can cause staining. Work in the shade if possible.
Step 3: Apply iron remover liberally. Spray or apply iron remover to the wheel face and wheel barrel — the inside of the wheel that faces the brake caliper is often the most contaminated area. Don't be stingy. You want the surface wetted and the product in contact with the contamination.
Step 4: Allow dwell time. Iron remover needs 2–5 minutes to react. You'll see the purple color developing as the chemistry works — this is the reaction between the chelating agent and iron oxide. Watch it work. Heavier contamination will turn a deeper purple. Let the reaction complete. Do not let the product dry on the surface.
Step 5: Agitate if needed. For heavily contaminated wheels, use a soft brush to agitate the iron remover across the surface while it's still wet. This works the chemistry into the textured areas of the wheel (lug nut recesses, spoke edges, barrel) where contamination accumulates and is harder to reach.
Step 6: Rinse thoroughly. Rinse the iron remover completely from the wheel surface with clean water. Rinse the barrel and face. The purple compound rinses away with the dissolved iron. Make sure the rinse is complete — standing iron remover product isn't harmful to the finish at the dilutions in wheel care products, but thorough rinsing removes all the dissolved contamination.
Step 7: Follow with wheel cleaner and a brush. After iron remover, the dissolved contamination has been loosened but may not be fully rinsed away. A follow-up wash with wheel cleaner and a brush removes any remaining residue. Rinse again and dry completely.
Step 8: Apply protection. A clean, decontaminated wheel is the ideal surface for a protective layer. Wheel wax, sealant, or a spray-on wheel protectant applied after iron decontamination means the next cycle of brake dust has less surface chemistry to bond to. This significantly reduces how aggressively contamination builds up before the next decontamination.
Common Mistakes
Letting it dry. If iron remover dries on the wheel surface, the concentrated chemistry can stain the finish. Don't apply iron remover and walk away. If you see it starting to dry before you've rinsed — spray water over it immediately to re-wet, then rinse promptly. Work one or two wheels at a time, not all four simultaneously.
Using it on hot wheels. Brake rotors and calipers get extremely hot during driving. The heat transfers to the wheel. Applying iron remover to a hot wheel causes the product to flash-react and dry almost immediately, which means inadequate dwell time and potential staining. Always work on cold wheels.
Using it as a replacement for regular washing. Iron remover isn't a wheel cleaner — it's a decontamination product. Use wheel cleaner to remove loose contamination first, then iron remover for the bonded iron. Trying to use iron remover to clean a heavily soiled wheel without washing first means you're applying chemistry over a layer of loose brake dust that will dilute the product and reduce its effectiveness.
Not doing it often enough. Iron contamination accumulates continuously on driven vehicles. Using iron remover once a year treats a chronic problem occasionally. Monthly to bi-monthly decontamination keeps contamination from reaching the level where it starts causing finish damage — and each session is faster and more effective than trying to strip months of buildup.
What You'll Notice After
A wheel that's been properly iron decontaminated has a noticeably different surface than one that's been washed but not decontaminated. The finish looks cleaner and more open — not just the color but the texture. On clear-coated or polished wheels, the surface will feel smoother. Brake dust at the next wash will be lighter-colored and easier to remove. Water will sheet off more cleanly.
The difference is subtle but real. Once you've done a proper iron decontamination cycle and then washed the wheels at the same interval a few weeks later, you'll notice the dramatic difference in how much less buildup there is. That's the result of having removed the bonded base layer that future contamination was adhering to.
How Often Is Often Enough?
For a daily driver with semi-metallic brake pads in normal use: iron decontaminate the wheels every 4–6 weeks. Add it to your monthly detail or wash-and-protect cycle.
For a car with ceramic brake pads: the contamination rate is lower because ceramic pads shed significantly less iron-rich dust. Every 8–12 weeks is often sufficient.
For a car that sits, or a weekend car with low mileage: the time-based schedule matters less than the contamination-based one. Check with iron remover at each wash. If the purple reaction is strong, decontaminate. If it's minimal, you may not need to.
Iron remover is one of those products that, once you see it work, you wonder why you weren't using it from the beginning. The purple reaction on a contaminated wheel is striking. The difference afterward is real. It belongs in every wheel care routine.