
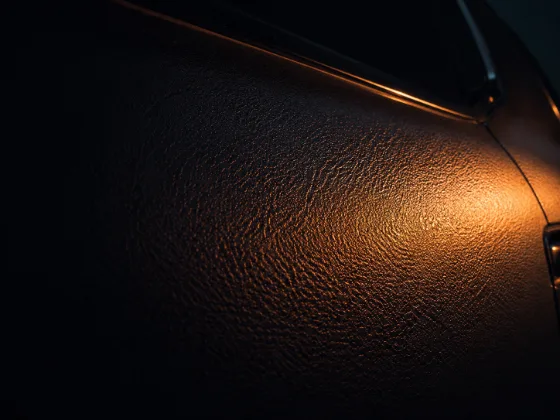
Orange peel is one of those paint defects that, once you see it, you can't unsee. That subtle bumpy texture in the paint that looks like the skin of an orange in the right light — most cars have it from the factory, and most owners never notice until they start paying attention to their paint.
Here's the full story on what it is, why it's there, and whether it's worth trying to fix.
What Orange Peel Actually Is
Orange peel is a surface texture defect in paint caused by uneven flow-out during application and curing. When paint is sprayed onto a panel, it needs to flow evenly across the surface before it cures. If it doesn't — because of incorrect spray gun settings, improper air pressure, environmental conditions during painting, or paint formulation issues — the paint surface "freezes" before it can fully level out. The result is a textured surface that looks smooth from a distance but reveals a bumpy, dimpled pattern up close.
The reason it's called orange peel is exactly what you'd expect: the texture resembles the skin of an orange. Under raking light or a paint inspection light, it shows up as alternating high and low spots across the surface.
Why Factory Paint Has Orange Peel
Here's the part that surprises most people: virtually every production car from every manufacturer has orange peel from the factory. It's not a defect in the sense of something that went wrong. It's a deliberate trade-off.
Factory paint application is optimized for speed, cost, and durability — not for a mirror finish. The paint is applied in an automated spray environment where variables like temperature, humidity, spray pressure, and film thickness are controlled but not dialed in with the precision of a high-end custom paint shop. The paint formulations are also engineered for chip resistance and durability, which often compromises flow-out behavior.
Luxury and exotic vehicles tend to have less orange peel than economy vehicles — more resources and time go into their paint processes — but even a new Ferrari will have some texture visible under inspection lighting. True zero-orange-peel paint is the result of extensive correction work after the factory finish, not the factory finish itself.
How to See It Clearly
Orange peel is best seen under direct sunlight at a low angle, or with a concentrated inspection light (sometimes called a paint light or swirl light) held at an angle to the surface. Overhead light in a garage often hides it. If you hold the light at roughly 45 degrees to the panel and look at the reflection, the orange peel shows up clearly as a pattern of irregular light and dark texture across the surface.
On a perfectly corrected panel, the reflection of the light source should be sharp, smooth, and undistorted. Orange peel distorts the reflection into a fuzzy, textured blur. That's the test.
Gloss Enhancement vs. Orange Peel Removal
There's an important distinction here that a lot of people miss: standard polishing — even aggressive paint correction — does not remove orange peel.
Standard polishing works by abrading the surface to remove scratches, swirl marks, and surface defects. But orange peel isn't a surface contamination or a scratch — it's the actual physical shape of the paint surface. The high spots and low spots are baked into the clear coat. To remove orange peel, you need to level the surface: cut down the high spots until they're even with the low spots.
This is why cars can look highly polished and still have orange peel. The surface can be free of swirl marks and scratches and still show the bumpy texture. They're independent conditions.
How Orange Peel Is Actually Removed
Orange peel removal is a multi-stage process that starts with wet sanding.
Wet sanding: Using ultra-fine sandpaper (typically 1500-3000 grit depending on the severity of the texture), the paint surface is carefully wet sanded to physically level the high spots. Water lubricates the paper and prevents loading. The goal is to sand until the surface looks uniformly hazy — which means you've leveled the texture — without cutting through the clear coat.
This step requires knowing your paint thickness. You need enough clear coat to sand without going through it. Factory clear coat on modern vehicles is typically 40–80 microns. Wet sanding removes material, so if you're starting with thin clear coat, you have limited room to work.
Compounding: After wet sanding, the surface is covered in fine sanding scratches. It looks terrible — uniformly dull and scratched. The next step is to compound those scratches out with a cutting compound and a cutting or medium pad on a dual-action polisher. This removes the sanding scratches and starts to restore gloss.
Polishing: After compounding, a finer polish on a finishing pad refines the surface further, removes the haze left by the compound, and brings the surface up to a true high gloss.
Protection: After all that correction work, you protect the paint immediately with wax, sealant, or ceramic coating.
When Orange Peel Removal Makes Sense
Orange peel removal is a significant undertaking. It's not a weekend project for a beginner, and done incorrectly, it can cause real damage — cut-throughs, DA haze, uneven correction, thin spots in the clear coat. So when is it actually worth doing?
Show cars and high-end builds: If the goal is a mirror finish under inspection lighting, orange peel removal is necessary. You can't get to that level of finish without leveling the paint.
After a fresh respray: New paint from a body shop or paint job often has significant orange peel because the painter was focused on coverage, not final finish. Correcting a fresh respray after it's fully cured is standard practice for any quality detail work on a freshly painted car.
If it genuinely bothers you: Orange peel is cosmetic. It doesn't affect protection, durability, or the structural integrity of the paint. If you can live with it — and most car owners do, happily — there's no functional reason to remove it.
Can You Do It Yourself?
Yes, but with caveats. Wet sanding requires a careful hand, proper technique, and the right materials. The risks are real: cutting through the clear coat, creating flat spots from uneven pressure, or sanding through the edge of a panel where clear coat is thinnest.
If you've never wet sanded before, practice on a panel you don't care about first. Take paint thickness readings before you start. Work slowly. Use a backing pad behind your sandpaper to distribute pressure evenly. Keep the surface wet. And stop if you see any color on your sandpaper — color means you've hit the base coat.
For a show-quality finish on a car you care about, consider having a professional handle the wet sand and at least supervise before you do it yourself. The polishing steps after wet sanding are more forgiving and a better place to build skills.
The Realistic Expectation
A properly executed orange peel removal and paint correction leaves a finish that looks genuinely different from the factory result — smoother, deeper, higher gloss, with a sharper reflection. Under inspection lighting, you should see a crisp, undistorted image instead of a fuzzy texture.
But it's also a commitment. You're removing material from the clear coat that can't be put back. Do it right, protect it properly afterward, and the result is worth it. Rush it or skip steps and you can create more problems than you solve.