
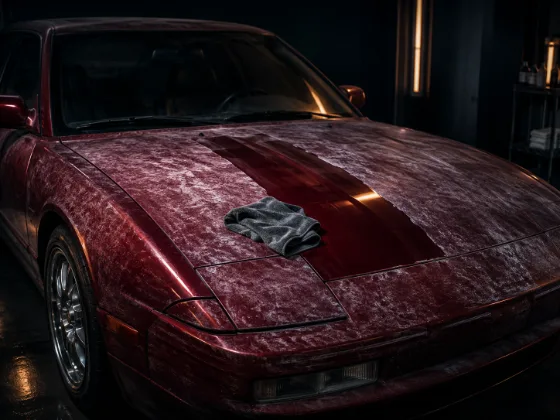
Oxidized paint is one of those things that looks catastrophic at first glance but often turns out to be fixable with the right approach. Whether you can save it depends on one thing: how deep the damage goes.
This is how to assess it, what to do about it, and when paint is actually too far gone to restore.
What Oxidation Actually Is
Oxidation is what happens when UV radiation breaks down the polymer chains in your paint's clear coat — and eventually the base coat underneath. The chemistry is straightforward: prolonged UV exposure causes the clear coat to degrade at a molecular level. It loses its ability to reflect light cleanly. The surface becomes microscopically rough and fragmented rather than smooth and continuous.
What you see is a chalky, hazy, matte appearance. Colors look faded and washed out. On dark colors, the surface often takes on a grayish cast. On light colors, the paint looks flat and dull. On red and yellow pigments especially, oxidation causes dramatic fading because those pigments are particularly vulnerable to UV degradation.
On older vehicles with single-stage paint — paint with no clear coat, where pigment and binder are in one layer — oxidation is even more visible because you're literally watching the pigment itself degrade. When you wipe a single-stage oxidized panel with a white cloth and it comes away with color transfer, that's the pigment actually coming off the surface.
The Two Categories: Surface vs. Deep
Surface oxidation affects only the top portion of the clear coat. The degradation is shallow enough that there's still intact, healthy material underneath. This is almost always repairable.
Deep oxidation penetrates through most or all of the clear coat. When the clear coat is consumed, the UV damage starts working directly on the base coat. At a certain point, the base coat itself begins to fail — you'll see it peeling, flaking, or separating from the primer. Once you're here, polishing is not going to save the paint. You'd be polishing away the last thin layer of clear coat and accelerating the failure.
The honest assessment: if the clear coat is still structurally present, even if it's hazy, you probably have options. If the paint is peeling, lifting at the edges, or flaking away in sheets, you're looking at respray or paint wrap territory.
The Scratch Test
Before reaching for a polisher, do a quick scratch test on the most oxidized area. Take your fingernail and drag it lightly across the surface. If you can feel the depth difference between where you scratched and where you didn't — if the nail is actually cutting through a soft, fragile layer — the clear coat is severely compromised. Polishing won't help much; it'll just accelerate the breakdown.
If the surface feels relatively solid under your nail even though it looks terrible, that's a good sign. The oxidation may be surface-level and polishable.
How Paint Thickness Tells You More
A paint thickness gauge gives you objective data. Factory clear coat on most modern vehicles runs 40–80 microns. If you're measuring 20 microns or less in oxidized areas, you're getting close to the floor. If you're under 10 microns, you don't have much clear coat left to work with, and aggressive compounding could cut through entirely.
If you don't have a paint gauge, estimate conservatively. On cars with extreme, widespread oxidation that's years in the making, assume the clear coat is thin and approach correction accordingly.
The Correction Process
Fixing surface oxidation is essentially aggressive paint correction — the same process used to remove swirl marks and scratches, just more intensive.
Step 1: Wash and decontaminate. Get the surface clean before you do anything else. Surface contamination that gets pushed into the polishing pad will cause more damage during correction.
Step 2: Start with compound. Heavy oxidation needs a cutting compound — something with real abrasive content — to remove the degraded clear coat material and expose the fresh layer underneath. Use a cutting or medium-cut pad on a dual-action or rotary polisher. Work panel by panel, using moderate speed and moderate pressure. You'll see the haze lifting in real time.
Step 3: Refine. After compounding, the paint will typically have some haze or light scratches from the abrasive. Follow up with a polishing step — finer compound, softer pad — to refine the surface and bring the gloss up.
Step 4: Protect immediately. Fresh, corrected paint is fully exposed. No wax, no sealant, no protection of any kind. Apply ceramic coating or at minimum a quality sealant or wax the same day. If you leave corrected paint unprotected, it will oxidize again — and faster than before, because you've used up some of the clear coat thickness doing the correction.
Single-Stage Paint: Different Rules
If you're working on a classic car, a work truck, or any older vehicle with single-stage paint, the approach is similar but the stakes are different. Single-stage paint doesn't have a sacrificial clear coat layer. When you polish it, you're cutting directly into the pigment layer. You have less room for error.
Use less aggressive abrasives than you'd reach for on modern clear coat. Work slowly. Check your progress frequently. And accept that on severely oxidized single-stage paint, some color transfer onto your pad is normal and expected — that's the degraded surface material coming off. It doesn't mean you're destroying the paint; it means the compound is doing its job.
What Results to Expect
Light to moderate oxidation: you can expect dramatic results from compounding and polishing — often 70-90% improvement in appearance. The paint may not look showroom-new, but it will look dramatically better.
Heavy oxidation with intact clear coat: you can still get significant improvement, but you may see some haziness remain in the worst areas. The paint will look substantially better than before, but it won't be perfect.
Heavy oxidation with compromised clear coat: you may get temporary improvement that degrades quickly as the remaining clear coat continues to fail. At some point, the honest answer is that the paint needs respray.
Preventing It From Coming Back
Oxidation comes back because UV radiation keeps working on the paint. The only things that slow it down are physical UV barriers — wax, paint sealant, or ceramic coating on top of the clear coat — and keeping the car out of direct sunlight when possible.
After correcting oxidized paint, apply the best protection you can and reapply it on schedule. A car that's just been through oxidation correction is more vulnerable than a car that's been maintained consistently, because the clear coat is now thinner. Protect it aggressively and keep it maintained.