
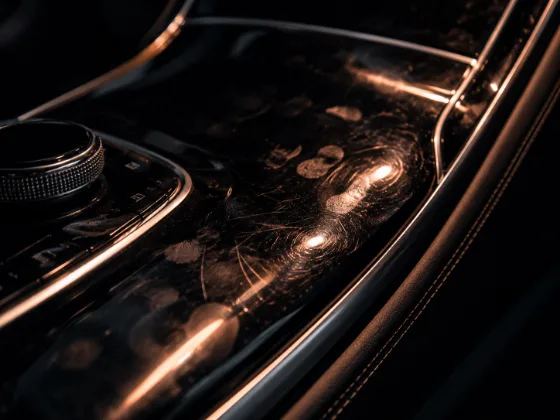
Piano black interior trim is the most unforgiving surface in any car interior. It shows fingerprints the second you touch it, every piece of dust that settles on it, every micro-scratch from a cloth that looked perfectly clean. It's also the surface people are most likely to clean incorrectly, because the instinct is to wipe it harder when they can still see marks — which is exactly the wrong response.
Here's what piano black actually is, why it's so sensitive, and how to clean it properly.
What Makes Piano Black Different
Piano black trim — also called gloss black, high gloss black, or lacquer black — is a mirror-finish plastic. It's typically ABS plastic with a multi-layer clear coat finish applied in the same general way that automotive exterior paint is applied: base coat for color, clear coat for gloss and protection. The result is a surface with a very high refractive index that produces the characteristic deep, mirror-like appearance.
That reflectivity is what makes it so unforgiving. A matte surface hides imperfections because light scatters in all directions off the textured surface. A mirror surface reflects light in precise directions — and any disruption to that surface (scratches, smears, contamination) shows up as a clear, defined anomaly in the reflection.
When you see "swirl marks" on piano black interior trim, you're seeing the same thing as swirl marks on paint: fine scratches that scatter light differently from the undamaged surface around them. These scratches come from abrasion — wiping with the wrong material, using too much pressure, or dragging contamination across the surface.
The Core Problem: Material Selection
The majority of piano black scratch problems come from wiping with the wrong material. Things that will scratch piano black:
- Paper towels — always. Paper is wood fiber and will scratch gloss plastic every single time.
- Standard household cleaning cloths
- Low-quality or incorrect microfibers — not all microfiber is the same. A microfiber with a rough weave or the wrong GSM is worse than a soft cotton cloth on gloss surfaces.
- Anything with grit on it — including microfibers that have been used on other interior surfaces and picked up particles
- Dry wiping with any cloth — moving dust across the surface with a dry cloth is abrasion
What you need for piano black: high-GSM, soft-pile microfiber — 400 GSM and above, plush texture. These cloths have more fiber mass and a softer face that doesn't drag across the surface the way a rough or thin microfiber does. They also need to be clean and lint-free. Dedicated cloths for piano black only, washed regularly and kept away from other detailing tasks.
The Cleaning Approach
Never dry wipe. Any dry cloth dragged across piano black is dragging dust particles across the surface. Dust on gloss is abrasive. This is the single most important rule. If you want to remove dust without full cleaning, use compressed air to blow it off the surface rather than dragging a cloth across it.
Lubrication is critical. The purpose of any cleaner on piano black is partly to clean but primarily to lubricate — to provide a slippery layer between the cloth and the surface so that you're gliding the cloth, not dragging it. This is why a few sprays of interior cleaner or even a lightly damp cloth performs so much better than a dry cloth.
The method:
- Apply a small amount of interior cleaner to a clean, high-quality microfiber (not directly to the surface — you want control over how much goes on and you don't want overspray landing elsewhere)
- Lay the cloth flat on the surface with almost no pressure
- Make a single, slow pass in one direction
- Lift the cloth. Do not rub back and forth. Do not make circular motions. One pass, one direction, then lift.
- Fold the cloth to a clean face and make the next pass on the adjacent area
- Follow immediately with a dry, high-quality microfiber to buff off any remaining cleaner — again, single pass, one direction, lift and fold to a fresh face
This is slower than normal wiping. That's the point. Rushing produces the circular scrub motion that creates swirl marks.
What About Fingerprints?
Piano black trim that's in a location that gets touched — gear selectors, door panel accents, center console trim — gets fingerprinted constantly. For ongoing fingerprint removal between full cleaning sessions, a quick detailer spray on a dedicated soft microfiber is the most practical approach. Mist the cloth lightly, one pass, one direction per area.
For fingerprints only — no heavy contamination — you sometimes need even less product than that. A microfiber that's been very lightly dampened with water can clean a fresh fingerprint without leaving any residue behind. The key is still the one-directional pass and the clean cloth face.
Removing Existing Scratches
If your piano black trim already has swirl marks and scratches from previous cleaning, they can sometimes be improved with plastic polish — but the approach requires care.
Plastic-safe polish (formulated for interior gloss plastics, not for automotive paint) applied with a foam applicator pad using very light, linear pressure can reduce fine scratches. Work in the same one-directional manner as cleaning — no circular motions. Use the minimum amount of product. After polishing, wipe clean with a damp microfiber and then dry-buff.
Deeper scratches — anything you can feel with a fingernail — generally cannot be polished out of interior plastic trim. The plastic is thinner than automotive clear coat, and aggressive polishing risks creating flat spots or haziness. Deep scratches in piano black usually require trim replacement.
Protective Products
Some ceramic coating products can be applied to interior piano black trim to provide a layer of protection and make contamination easier to remove. These are different products from exterior ceramic coating — they're typically thinner and designed for interior plastics.
The benefit: after coating, fingerprints and contamination release more easily with minimal cleaning product. The surface becomes easier to maintain.
The application process: clean the surface thoroughly using the methods above, ensure it's completely free of contamination, then apply the coating with a microfiber applicator per the product's instructions. Cure time applies — don't touch or clean the surface for the specified period. This is a worthwhile investment for trim pieces that are frequently touched.
Prevention as Strategy
Piano black trim benefits more from preventive thinking than any other interior surface.
Location matters: if you have piano black in a location that gets constant inadvertent contact — a trim piece where your hand naturally rests, a center console section you touch constantly — you can cover it with paint protection film (PPF) cut to fit. This isn't visible on gloss black surfaces if applied properly and provides genuine protection from both scratching and fingerprinting. For daily drivers with piano black in high-contact locations, this is worth considering.
Regular light maintenance keeps heavy buildup from developing. A quick pass every week or two with the right cloth and minimal product is significantly easier to execute correctly than a full clean on heavily contaminated surface where the temptation to use more product and more pressure becomes hard to resist.
The Bigger Picture
Piano black interior trim is a design choice that looks exceptional when maintained and requires more discipline than any other interior surface to maintain properly. If you find it genuinely impractical for your lifestyle — you have kids, the trim is in a constantly touched location, you don't have time for the careful cleaning approach — PPF or even replacement with matte trim (if available for your vehicle) is a legitimate alternative. Not every surface design is appropriate for every usage pattern.
For people who want to maintain it: the technique described here works. Slow down, use the right materials, never wipe dry, one pass in one direction. The results are worth the effort.