
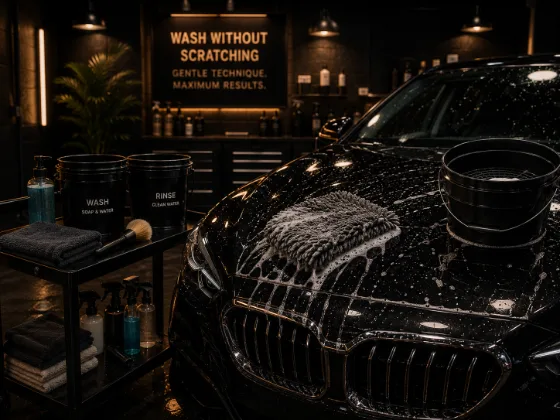
Here's something that bothers a lot of people when they first learn it: washing your car the normal way — bucket, sponge, done — is one of the worst things you can do to the paint.
Not because washing is bad. Washing is essential. But because the typical approach drags abrasive particles across clear coat repeatedly and calls it clean. Over time, that damage accumulates into the hazy, swirled paint that makes even recently washed cars look dull.
The good news is that washing without scratching isn't complicated. It just requires understanding why the scratches happen in the first place.
Why Standard Washing Scratches Paint
Your car's paint is a magnet for fine particulates — road dust, brake dust, pollen, silica from road surfaces. These particles are tiny, hard, and sharp. When they're sitting on your paint and you drag something across them — a sponge, a mitt, a towel — you're using those particles as a cutting medium against your clear coat.
The typical single-bucket method makes this worse. You load your mitt with soapy water, wash a panel, and then dip the mitt back into the same bucket to reload. But when you dip that mitt in, you're also depositing the grit it just picked up off your paint into the bucket. Now your wash water is a grit suspension. Every subsequent load of the mitt picks up that suspended grit and carries it to the next panel.
After twenty minutes of washing, you've essentially polished every panel with a slurry of fine abrasive. That's the mechanism. The fix is straightforward once you see it.
The Pre-Wash Step
The most impactful thing you can do to reduce scratch risk during washing happens before you ever touch the car.
A pre-wash is a chemical you apply to the wet car that breaks down road film, grease, and surface contamination chemically — before you make physical contact with the paint. You spray it on, let it dwell for 60–90 seconds, and rinse it off. A significant amount of contamination comes off in that rinse water, never having been touched by your mitt at all.
Every particle removed in the pre-wash rinse is a particle that can't scratch your paint during the contact wash. This is the single most underrated step in preventing wash-induced scratches.
The Two-Bucket Method
This is the solution to the dirty-water problem. Instead of one bucket, you use two:
- Bucket 1 (Soap bucket): Your shampoo solution. This stays as clean as possible throughout the wash.
- Bucket 2 (Rinse bucket): Clean water. After washing each panel, you rinse your mitt here before loading it with soap again.
The sequence is: load mitt from soap bucket → wash panel → rinse mitt in rinse bucket → agitate mitt against grit guard to release particles → load mitt from soap bucket again → next panel.
The grit guard is a plastic grid that sits at the bottom of the rinse bucket. When you agitate the mitt against it, the dirt and grit falls through the grid and settles below it. The grit stays at the bottom; you reload your mitt from the cleaner water above.
This dramatically reduces the grit contamination in your wash water. It's not perfect — some particles still make it through — but it's the difference between steadily adding scratches and keeping the damage to a minimum.
Mitt Choice Matters
A sponge has a flat, closed-cell surface. When grit gets on a sponge, it stays on the surface and gets dragged across the paint. A wash mitt — microfiber or lamb's wool — has long, open fibers. Grit gets pulled away from the contact surface and into the fibers, where it stays until you rinse the mitt.
This is why the mitt choice matters more than most beginners realize. The same grit that would scratch with a sponge gets partially trapped in the mitt fibers instead of riding between the mitt and the paint.
Rinse the mitt before you dip it into the soap bucket — every time. The rinse bucket exists specifically for this.
Movement Pattern: Straight Lines Only
Wash in straight lines. Top to bottom, working across the panel. Never in circles.
If a particle of grit does end up between your mitt and the paint, a straight-line motion creates one linear scratch. A circular motion takes that same particle and drags it in every direction, creating the distinctive swirl pattern that gives swirl marks their name.
Under artificial light, a straight-line scratch is nearly invisible. Under a direct light source, swirl marks are impossible to miss. The motion pattern is the difference between damage you can live with and damage that makes paint look permanently wrecked.
Work Top to Bottom
Gravity exists. The lower panels on a car — door sills, rocker panels, lower bumpers — collect the heaviest contamination. The roof is relatively clean by comparison.
Work from the roof down so that contaminated rinse water drips down to panels you haven't cleaned yet, not onto panels you've already done. This also means you're loading your mitt from the cleanest panels first, when the wash water is freshest.
Rinse as You Go
Don't let shampoo dry on the paint, especially in warm or sunny conditions. Rinse each panel or section as you finish it. Dried shampoo leaves a filmy residue that's harder to remove than the original dirt, and in some cases can cause light spotting.
The Final Rinse
A thorough final rinse removes the shampoo from all surfaces — including door gaps, mirror brackets, trunk seals, and anywhere water pools. Rinse with good flow, not just a light mist.
A "sheeting rinse" — where you remove the nozzle and let water flow freely across the panels — helps water sheet off cleanly in large flows rather than beading up, which reduces the amount of standing water your drying towel has to move.
Drying Without Adding Scratches
Drying is the last place scratches happen in a wash. A contaminated drying towel, circular drying motions, or wiping a panel that still has grit on it can undo all the careful washing you just did.
Use a dedicated, clean, plush microfiber drying towel. Fold it flat, lay it on the panel, and either blot gently or wipe in straight lines. Never scrub, never circle, never drag a dry towel across a panel that still has visible contamination on it.
If you have access to a leaf blower or a car dryer, use it to clear water from gaps and seams before towel drying. This removes the standing water in hard-to-reach spots that would otherwise drip out onto the panels you just dried.
The Honest Baseline
Perfect, zero-scratch washing is not achievable in real-world conditions. The goal is to minimize scratch addition, not eliminate it entirely. Two-bucket washing with pre-wash, good mitts, and straight-line technique will dramatically reduce the damage compared to a single-bucket sponge wash. Over time, that difference is clearly visible in how your paint looks.
The basics — pre-wash, two buckets, straight lines, grit guards, dedicated drying towel — cost almost nothing extra and make an enormous difference. That's where to start.